
Ghost is making me learn server management and sudo terms. I did switch this site to a shared hosting account but on the side hand was still trying to figure out VPS. Today, I ended up hosting 3 sites on a single VPS, one WordPress and the other two Ghost. With SSL and WWW. redirect on all three of them. Now, let me tell you even the 1 GB memory on the VPS is coming out to be less for all three. For the last Ghost site when I was installing it kept saying you don’t have memory and when I check only double-digit memory is free.
Let me tell you how I did this because when I was trying to put WordPress and Ghost on the same VPS, I could find a single help document online on how to do this. Now, that I have done this I still don’t know if everything I have done is secure, but I am very confident that it will work.
First, you need to install Ubuntu on your server, I use version 20.04 for this but should work on others as well then login to root via SSH and follow the below commands;
apt updateapt upgradeapt install nginxufw allow 'Nginx Full'apt install mysql-servermysql_secure_installation -papt install php-fpm php-mysqlcurl -sL https://deb.nodesource.com/setup_16.x | sudo -E bashapt install -y nodejsStop here and take a break and see what all have been done on the server. After this, we are ready to install WordPress and Ghost on the server where we are running NGINX+MYSQL+PHP+NODE.JS
Now, I would prepare Mysql databases and users for WordPress and Ghost;
mysqlFor WordPress (you have to change ‘PASSWORD’ as you want)-
create database wp_databaseone_db default character set utf8 collate utf8_unicode_ci;create user wp_userone_user identified by 'PASSWORD';grant all on wp_databaseone_db.* to 'wp_userone_user';For Ghost (you have to change ‘PASSWORD’ as you want)-
create database gh_databasetwo_db;create user gh_usertwo_user identified by 'PASSWORD';grant all on gh_databasetwo_db.* to 'gh_usertwo_user';If you want to host another Ghost or WordPress repeat the database and user creation with a new database name and user name.
flush privileges;exit;Now you would be out of MYSQL and to your root.
Now we need to create directories where the installation of WordPress and Ghost will happen. Now WordPress I use root as a user but for Ghost, you need a new user with superuser control.
Let’s start with WordPress;
mkdir -p /var/www/sitenamecd /var/www/sitenamewget https://wordpress.org/latest.tar.gztar -xzvf latest.tar.gzrm latest.tar.gzcd wordpresschown -R www-data:www-data /var/www/sitename/wordpresscp wp-config-sample.php wp-config.phpvim wp-config.php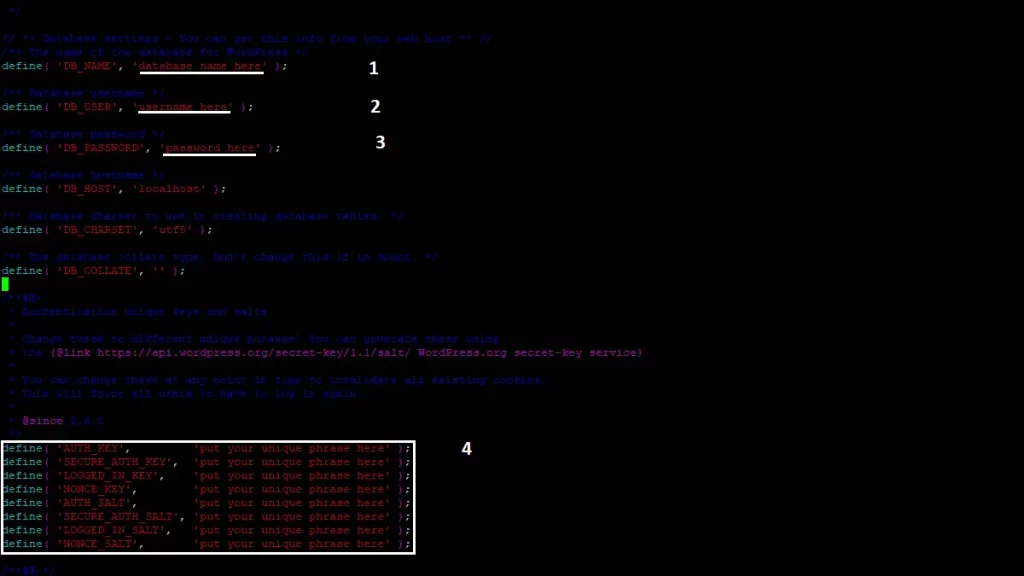
Now press i on the keyboard you will be allowed to edit the file, navigate to the place where you need to type your database name, user name and password. You have to change all 4 details and for the 4th one visit https://api.wordpress.org/secret-key/1.1/salt once done go to the last on the wp-config.php file where it is written “require_once ABSPATH . ‘wp-settings.php’;” after that line add;
define( 'FS_METHOD', 'direct' );Now press :wq for saving and exiting from the vim editor.
cd /etc/nginx/sites-availablevim sitename.confPress i on the keyboard and enter the code below, do change the location and your domain name.
server {
            listen 80;
            root /var/www/sitename/wordpress;
            index index.php index.html;
            server_name Your-Domain-Name.COM;

	    access_log /var/log/nginx/Your-Domain-Name.access.log;
    	    error_log /var/log/nginx/Your-Domain-Name.error.log;

            location / {
                         try_files $uri $uri/ /index.php?$args;

            }

            location ~ \.php$ {
                         include snippets/fastcgi-php.conf;
                         fastcgi_pass unix:/run/php/php7.4-fpm.sock;
            }

            location ~ /\.ht {
                         deny all;
            }

            location = /favicon.ico {
                         log_not_found off;
                         access_log off;
            }

            location = /robots.txt {
                         allow all;
                         log_not_found off;
                         access_log off;
           }

            location ~* \.(js|css|png|jpg|jpeg|gif|ico)$ {
                         expires max;
                         log_not_found off;
           }
}
Once done just press :wq this will save and exit the vim editor.
ln -s /etc/nginx/sites-available/sitename.conf /etc/nginx/sites-enabled/nginx -t #there should be no error'ssystemctl restart nginx
Now go to your browser and type your domain name and fill in the details and WordPress is up and running.
To install SSL certificate we use Certbot, do the code below:
apt install snapdsnap install core; sudo snap refresh coresnap install --classic certbotln -s /snap/bin/certbot /usr/bin/certbotcertbot --nginxNow, follow and complete the instructions. You will still get into issues like upload limit and and limit size just do a google search on how to do this on NGINX and you are done.
Let’s look at Ghost, for this, you need a new user, create one by;
adduser usernameusermod -aG sudo usernamesu - usernamesudo mkdir -p /var/www/sitename2sudo chown username:username /var/www/sitename2sudo chmod 775 /var/www/sitename2cd /var/www/sitename2sudo npm install ghost-cli@latest -gghost installFollow the instructions and remember you already have Mysql database and user for Ghost as gh_databasetwo_db, gh_usertwo_user and PASSWORD.
Blog URL : https://Your-Second-Domain-Name-.COM
MySQL hostname: localhost
MySQL username: gh_usertwo_user
Password: PASSWORD
Ghost database name: gh_databasetwo_db
Set up NGINX?: Yes
Set up SSL?: Yes
Set up systems?: Yes
Start Ghost?: Yes
If all goes well you will have Ghost running and you just need to visit https://your-domain-name.com/ghost if you get stuck then you can run the command “ghost setup” and fill in the details above again. If an error is that directory is not empty then empty it by command “rm -r directoryname” and run again “ghost install”.
By now you should have WordPress and Ghost both running with SSL. Good Job now if you want to install another WordPress or Ghost site on the same server then here comes the tricky part.
For 2nd WordPress site, you would create another Mysql database and user, you would do everything similarly to what is done for the first one the only things that will change is the site directory to “sitename3” and in the /etc/nginx/sites-available the come will be the change a bit to:
server {
            listen 80;
            root /var/www/sitename3/wordpress;
            index index.php index.html;
            server_name Your-Third-Domain-Name.COM;

	    access_log /var/log/nginx/Your-thirt-Domain-Name.access.log;
    	    error_log /var/log/nginx/Your-third-Domain-Name.error.log;

            location / {
                         try_files $uri $uri/ /index.php?$args;

            }

            location ~ \.php$ {
                         include snippets/fastcgi-php.conf;
                         fastcgi_pass unix:/run/php/php7.4-fpm.sock;
            }

            location ~ /\.ht {
                         deny all;
            }

            location = /favicon.ico {
                         log_not_found off;
                         access_log off;
            }

            location = /robots.txt {
                         allow all;
                         log_not_found off;
                         access_log off;
           }

            location ~* \.(js|css|png|jpg|jpeg|gif|ico)$ {
                         expires max;
                         log_not_found off;
           }
}
For SSL just run “certbot –ngnix” and follow the instructions.
Let’s look at Ghost now which is a bit more tricky because it will install and create the conf file on its own and you have to edit the port in them. That worked for me but it should happen automatically you try and see it works for you if not do what I did:
su - username
cd /var/www/sitename2
ghost stop
sudo mkdir -p /var/www/sitename4
cd /var/www/sitename4
ghost install
Blog URL : https://Your-Forth-Domain-Name-.COM
MySQL hostname: localhost
MySQL username: gh_userfour_user
Password: PASSWORD
Ghost database name: gh_databasefour_db
Set up NGINX?: Yes
Set up SSL?: Yes
Set up systems?: Yes
Start Ghost?: No
cd /etc/nginx/sites-available
sudo vim siteforth.conf #should be there auto created by Ghost
In the conf file of the fourth site look for Change the “proxy_pass http://127.0.0.1:2368;” change it to 2378.
sudo vim siteforth-ssl.conf #should be there auto created by Ghost In the SSL-conf file of the fourth site look for Change the “proxy_pass http://127.0.0.1:2368;” change it to 2378.
nginx-t #there should be no errors
sudo systemctl reload nginx
cd /var/www/sitename4
vim config.production.json
In the json file change the port to 2378 and save and exit the file.
ghost start
cd /var/www/sitename2
ghost start
With this, your second Ghost site should be up and running. It took me almost 3 days to figure this out and there is not one place which would tell me how I could run PHP and Node.js on the same server. I know there are places where I got stuck but there is a lot of help and documents to solve that I am still learning and hopefully will be comfortable soon to shift this blog to Ghost. If you don’t know why I shifted back to WordPress have a look. I am trying to learn new things and also how to manage a server. Doing all this is making me buy and run a small home server at home.